General File System Settings
General

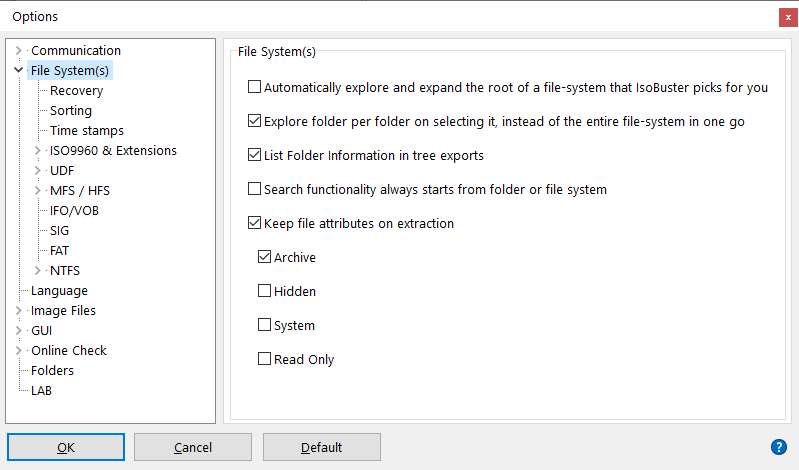
Automatically explore and expand the root of a file-system that IsoBuster picks for you
When you select a drive / disk in IsoBuster (and so also on startup, when a drive is auto-selected) the media is scanned to find its layout and file systems pointing to files and folders. If this option is checked, IsoBuster will also immediately expand that file system and show the root.
Ideally this option is unchecked since you may want to inspect a different session or partition, or another file system. If this is set, you may loose some time first while the pre-selected file system's root is being explored.
Explore folder per folder on selecting it, instead of the entire file-system in one go
When you select a folder in a file system, that folder is explored to find the files and folders inside it. This is the ideal selection to not waste too much time.
If this option is unchecked, all folders will be explored in the file system, when it is selected. If it is a slow medium or a huge volume with lots of files and folders, this may take a while. For instance a large NTFS or FAT Hard Drive.
Therefore this option is ideally checked, so that you can drill down to the files and folders of your choice, without exploring folders that you're not interested in right now.
List Folder information in tree exports
When this option is checked IsoBuser will also place Folder information in the File List. For instance its LBA, which is the Logical Block Address of where the structure describing the folder is located on the disc.
Search functionality always starts from folder or file system
Default, when you select an object in either (left) treeview or (right) listview and next start a search via the search edit box in the top right, all its child objects will be tested against the search string.
If this is an object that contains multiple file systems, those multiple file systems will be searched. For instance, if you select a session object and start a search, all the tracks in the session will be tested, and all the file systems in those tracks will be tested as well. Prior to IsoBuster 4.2 only a (single) file system, the one that made the most sense, would be tested. Switch this option on again, to revert to the older functionality, where only one file system at a time would be tested.
Keep file attributes on extraction
Default, file attributes Archive, Hidden, System and Read Only are not set on files that are extracted from various media, even if the files on that media contain these attributes.
When this option is checked, selected file attributes are set on files that are extracted, but only if the files on the media had them set as well.
Things to consider:
- Files on read only media such as CD, DVD, BD often have the 'Read Only' attribute set. If you tell IsoBuster to keep this attribute on extraction, the resulting files will not be edit-able, until you manually change the attribute on the file(s) again.
- Default, modern OS truly hide files with the 'Hidden' attribute. So even though they were extracted, if your system is not setup to see them, you might not be able to find the files after extraction.
- Default, modern OS also hide 'System' files. So if you extract files with this attribute, and you setup IsoBuster to keep this attribute on extraction, you might also not be able to find the file(s) afterwards
Sorting

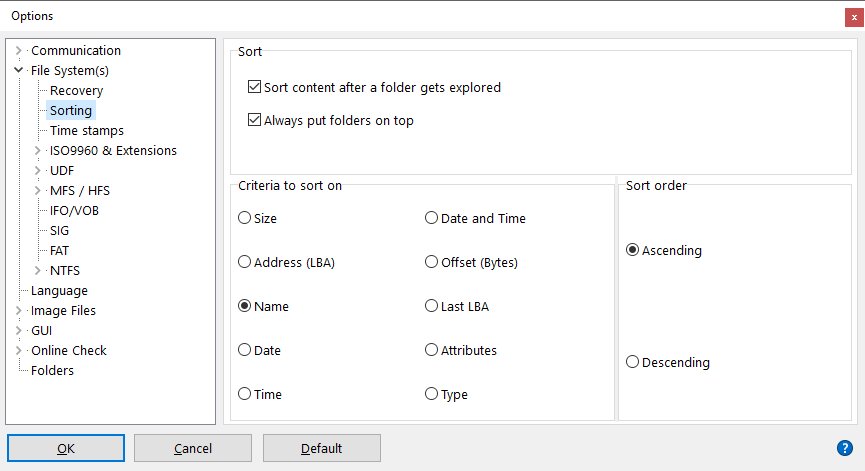
It is possible to have IsoBuster sort the data before it is first displayed. Let's refer to it as "background sorting". This background sorting happens immediately after the data has been read into memory, before it is displayed, and only then. The moment you sort again using the GUI, that new sort order takes precedence over background sorting, and it is always applied, for every folder that is opened from that point onward. So, already explored folders will be sorted again using the GUI setting. The moment GUI sorting is in effect, background sorting is disabled for all new data that is explored. No point to sort twice before displaying. GUI sorting is reset again when the application is closed and background sorting is in effect again when the application is started again.
The criteria and sort order are self explanatory. Always put folders on top means that folders will always be shown first in the list. (on the right hand side in the listview)
Time Stamps

For every file and directory there is a time stamp and a time zone stored in the file-system. The time stamp is typically the "Modified" time stamp of the file that was copied to the media. The time zone is typically the time zone of the system that was used to create or write to the disc or disk. So if the system was, for instance, a British system and the time zone was set correctly on that system, then the time zone stored on the disc, per file and directory, would be GMT 00:00. If that system was an American system, the time zone would be between GMT -04:00 and GMT -08:00 or even GMT -09:00 for Alaska. In Japan for instance the time zone would be GMT +09:00.
If you're interested in the different time zones and your system settings, double click the clock in the bottom right hand side corner and play a bit with the "time zone" option.
A great site to check out the time in other places here : http://www.timeanddate.com/worldclock
IsoBuster, up to version 1.6 Beta 12, would always use the time stamp and ignore the time zone. So the local time stamp of the file would be used to display the file-time in the right pane (ListView) of the program and this same time stamp would be used to assign to the file after extraction via IsoBuster. This is in fact the same as what Windows 9x (95, 98, ME) does for files in the ISO9660 and derivatives file-system.
As of Windows NT (NT4, 2K, XP) Windows converts the stored time stamp by taking the time zone of the file, the time zone of the system and daylight saving time (when applicable) in account ! Windows NT does that for all file systems. Windows 98 does this only for the UDF 1.02 file-system. Windows does this conversion for display purposes but also assigns this time stamp to a file copied from CD or DVD. As of IsoBuster version 1.6 Beta 13 this is now also the default setting.
For investigative purposes, following settings may be used to switch between the actual local time stamp and the converted time stamp. Changes made here are stored and always applied unless you switch the setting back.
To see the time zone of a file or directory, independent from following settings, right mouse click a file and choose properties. The second tab of the properties window shows the time zone of the file or directory.
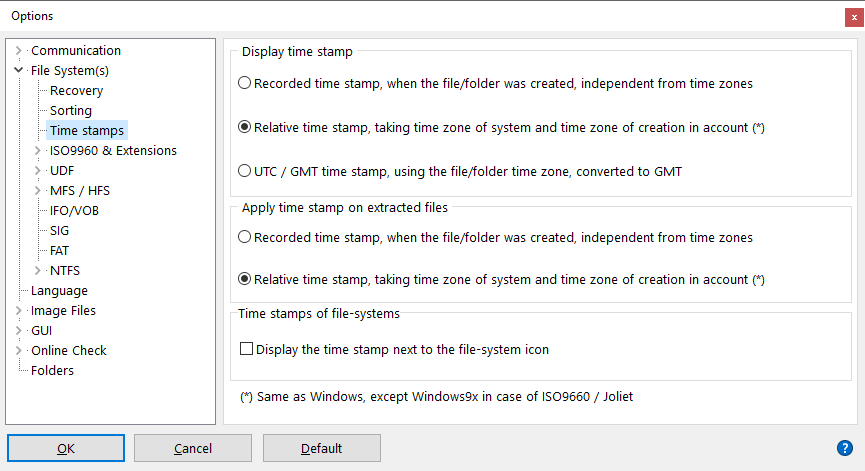
Display time stamp
Local time stamp, when the file was created, independent from time zones
Ignores time zones stored in the file-system and time zone of the system itself.
Relative time stamp, taking time zone of system and time zone of creation in account
Takes the time zone of the file or directory in account, together with the time zone of the system and daylight saving time (when applicable).
Apply time stamp on extracted files
Local time stamp, when the file was created, independent from time zones
Ignores time zones stored in the file-system and time zone of the system itself.
Relative time stamp, taking time zone of system and time zone of creation in account
Takes the time zone of the file or directory in account, together with the time zone of the system and daylight saving time (when applicable).
Time stamps of file-systems
It is possible to display the time stamp of a file-system next to the file-system icon. The time stamp is then displayed between square brackets, e.g. [01/03/2001 8:45:00]
or [N/A] when the file-stamp is not available, which is typically the case for recovered file-systems (e.g. UDF) or the flat file list.