Creative editing of file properties in files found based on their signature
During a scan for missing files and folders, IsoBuster is able to recognize a great deal of files based on their signature. These files are then listed under the Files found via their signature file-system icon:  . That is besides the files that IsoBuster can find via the various file systems of course.
The signature of a file is made up by certain characters, bytes, that are typically at a certain position in the file. It is actually a difficult thing to do, recognizing such files, as most files are not optimized for this sort of file finding. In fact media, and file systems in general, are not designed really to facilitate this sort of file finding. So having the power of IsoBuster at hand to actually change what was found increases your chances for success.
Indeed, besides IsoBuster's excellent file finding routines, which likely will find most of your important files, you still have total control over what was found. You can still change what IsoBuster found based on what you know about the files on your disc. E.g. if you know that all files were zip files, then you can delete other files for instance.
To be able to make these changes, first check if it is enabled for you, via the options, check Enable advanced editing, adding and deleting. If enabled, you will have the option Add file (starting from a right mouse click on the Files found via their signature file-system icon ).
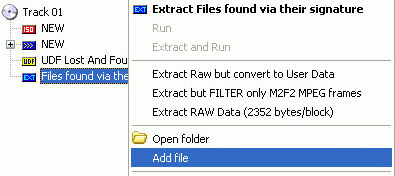
More options, Rename, Edit, Delete become available if you right mouse click the files found via their signature in the right pane of IsoBuster:

The most obvious option Rename is essentially the same as clicking the selectedfile once more, or clicking the F2 button when a file is selected. Ideal to for instance change the extension of a file if you don't agree with IsoBuster's analysis on the file type.
The more advanced features Add file, Delete and Edit are those we want to explain a bit more. Let's start with following example, 4 jpg files and one zip file were found based on their signature.
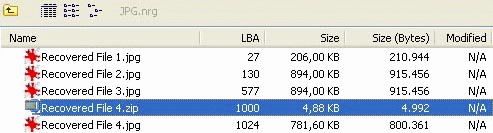
PS. this is a fake example as in fact IsoBuster is clever enough to not make this mistake and it won't find a zip file in a jpg file but it's a good example for dozens of other possible combinations that can exist.
Now suppose I was sure that there were only 4 jpg picture files on the CD and IsoBuster does find them, however IsoBuster also finds a zip file which does not exist. This sort of behavior is possible if a file happens to have a combination of bytes in its body that accidentally resembles the signature of a file. It's something that cannot be avoided in data recovery based on file-signatures. Remember, most files are not optimized for this sort of file-finding, and neither are the file systems. IsoBuster implements a range of measures to prevent these false positives, but it can happen.
The effect from this example is that jpg number 3 will in fact be corrupt after extraction, because the end was cut, and put in a zip file, which in turn is corrupt as well (as it was not really a zip file afterall). IsoBuster decided that the length of jpg 3 ended where the zip file started, which is how lengths are determined with this sort of file finding.
However, this is easily fixed. Select the zip file in IsoBuster, right mouse click and select Delete. The file will be deleted from the in memory managed list of found files. Obviously nothing is deleted physically from the media. If you run the find missing files and folders option again, the same file would be found again.
What you will also notice after the delete is that the file on an address (LBA) just before the zip file, will increase in length. The size grows till the start address of the next file that could be found. In this example this means that jpg 3 grows to its real size, and now when you extract it, it is not corrupt anymore.
There are a few exceptions to the auto-growing of the previous file. If the files have been changed (via Edit or Add file for instance) then the the previous file won't always grow in size because otherwise the program could be undoing what you manually changed already.
However, this is where the feature Edit comes in handy. Select the file which file length you want to change and select Edit. An edit window appears in which you can change the physical properties of the file. The location on the media (LBA = Logical Block Address), the length in bytes and the offset. Most files start at offset 0, but just in case it is made possible to change it to any value inside the block. PS. A block is 2048 bytes in size.
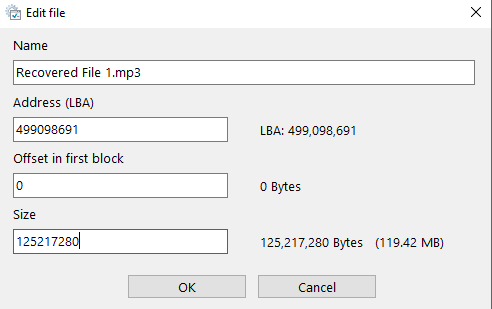
Suppose you want to change the length of a file to where the next file starts. Look at the start address of the file you want to change, write down the Logical Block Address (LBA). Note the LBA of the next file, where the file will end. Subtract both addresses from each other and you have the length in blocks. Multiply that value by 2048 (which is the amount of bytes per block) and you will get a file length you were after.
If all this information sunk in, then you won't have much problems with the option Add file either. If you know where a file is located on the disc, you can create this file in IsoBuster's list of found files and consequently you can have IsoBuster extract that file for you. This option can be extremely useful in combination with Sector View, hunting for a special missing file for instance. But this will be explained in a following article.
Following information may be interesting as well:
- File Signatures are often refered to as "magic numbers" (Magic numbers according to WikiPedia).
- FileFacts.net: Invaluable source for file extensions, Look them up etc.
- FileExt.com: Another source for file extensions
- File-Extensions.org: Find file extension details, including descriptions and associated applications.
- DotWhat.net: This site also contains a huge database of file extension information.
- FileInfo.com: Another site with a huge database of file extension information.