Sector View gebruiken om verloren bestanden terug te vinden
In previous article we talked about how to Add files to a list of Files found via their signature.  We also touched the possibility to use Sector View to hunt down files you know are there but cannot be found automatically.
It should be mentioned that this article is in the range of what we would call Engineering. It requires some knowledge about the deeper mechanics of files and how data is stored on data carriers. However it may be a jump start to get a deeper understanding as well.
A CD, DVD, BD or HD DVD is built up from blocks, one after the other. Blocks and Sectors are used in the same context here. In this article a block is a sector and vice versa. Deep down there are several mechanisms, depending on the disc type and formatting (manufacturer formatting or end user formatting). So in reality the blocks that we get to see are not always really one after the other, deep down the data may be organised differently, or managed in larger chunks etc.
But the so called user-data blocks are seemingly organised one after the other, with incrementing addresses, starting from address 0, and the size is 2048 bytes or 2 KB per block.
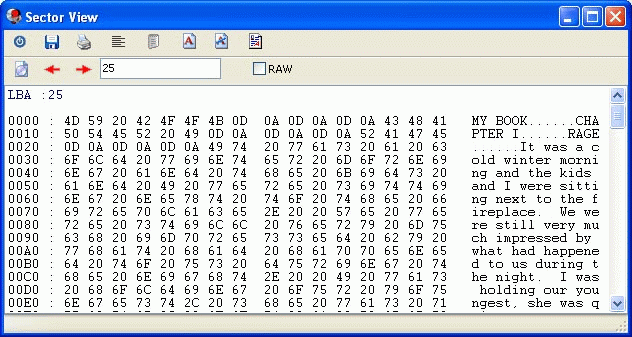
This is where Sector View comes in handy. The Sector View window allows you to see the content of every sector or block, provided it is readable. An error message is displayed if it's not readable. Easy scrolling through the sectors can be done via the buttons on screen or if you push the Ctrl button in combination with an arrow (right or left) on your keyboard.
To get the Sector View window, right mouse click an object (a file, a folder, a track,...) and select Sector View. Following screenshot is what you get then, the address in the box is the address of the block that is currently displayed.

Now, to hunt down files. Suppose you did a scan for missing files and folders and you know a certain file is present on the disc, but it was not found by the software.
If the file is not shown in the Files found via their signature list.  then the signature of the file does not match a signature in the program's database, or the file doesn't really have a good signature. Take a normal text file for instance, very hard to detect as ASCII text can be part of any type file, from the typical text based files (.html, .ini, .bat,...) to binary files (such as .exe etc.) as well.
In this example (see screenshot) we're going to look for a text file that we know is present. Suppose you were writing a book and the data has gone missing. You know what you wrote, or at least partially, so you know what to look for. Right mouse click the track icon in the left view pane, select Sector View and start scanning through the data, block per block.
Except for certain Macintosh formatted discs, and except for very small files (< 2 KB) in the UDF file system, all files on optical media start at offset 0 in a block. In other words, you'll find the beginning of the file on top in the Sector View window, not somewhere in the middle of the block. So that's what we concentrate on when looking through the sectors.
In the example (screenshot) we found the start of our text at sector address 25. Write the address down.
Continue skipping through the blocks until you also see the end of your file, or if you're unsure, make sure to define a very big byte size afterwards when you create the file. If you find the end, subtract the start address (e.g. 25) from the ends address (e.g. 125) and you have the block length of the file. The block length times the amount of bytes in a block (2048 bytes per block) makes a length of 204800 bytes in this example.
We're nearly there. Now it's back to what was explained in previous article. Use Add file to add a file to the list. Create it with the start address you found (e.g. 25) and set the size to 204800 bytes (per example). Give it an appropriate name, e.g. My book.txt and you're done. You can now right-mouse click the freshly created file and extract it to your HD.
PS. if you know more about the file you're looking for, either ASCII or binary signatures, then bare in mind that IsoBuster is not a hex-editor. The computer savvy will know how to make an image file of a disc instead and use a hex-editor on the resulting file to look for certain signatures. After some searching and the trusted calculator of course all the above still applies and you can use IsoBuster to extract files per your needs.